
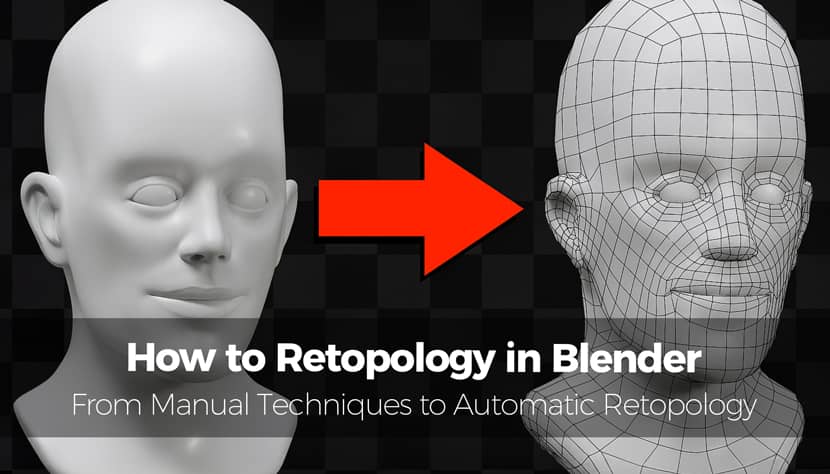
Retopology is one of those essential skills every 3D artist has to learn. Whether you're sculpting complex characters, designing props for a game, or preparing assets for animation, having clean, optimized geometry is really critical. In this guide, we'll explore how to retopologize 3D models in Blender using both manual and automatic techniques. You'll discover why it matters, how to do it step-by-step, and which tools can simplify your workflow. Let's read the article and learn something new today!
In this article, we’ll be focusing exclusively on Blender, which remains one of the most accessible and powerful platforms for 3D modeling and retopology. Best of all, it's free, open source, and constantly updated by a vibrant 3D community.
What Is Retopology in 3D Modeling?
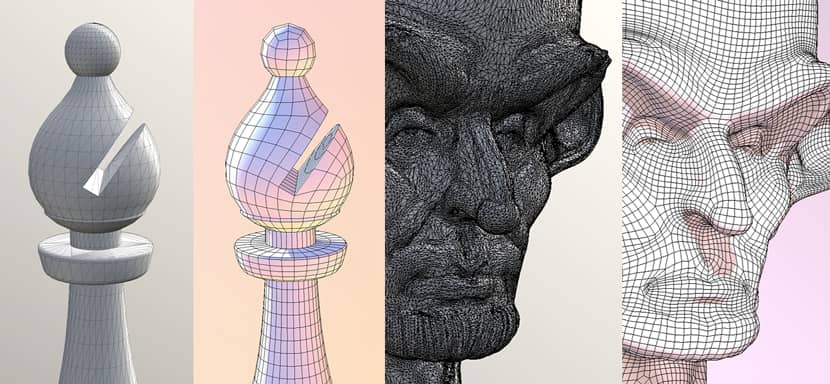
Starting from the basics and using simple words, we could say that retopology is the process of recreating a 3D mesh with cleaner and more efficient topology. Instead of working with a high-resolution, sculpted model that might contain millions of polygons, retopology allows you to create a new, optimized version of the mesh that is suitable for animation, texturing, and rendering.
The goal is to reduce polycount while maintaining the shape of the model, and to structure edge loops in a way that supports deformation. A retopologized mesh is not only lighter and easier to work with but also crucial for UV mapping and rigging as well.
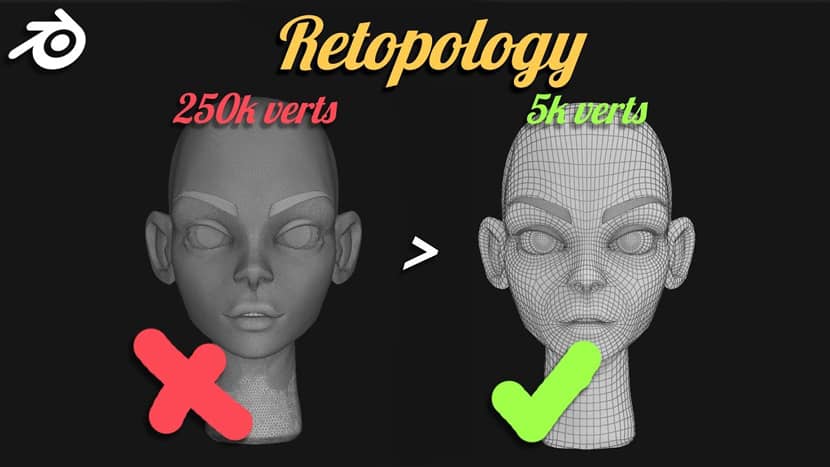
Image by VeryHotShark. Visit their YouTube channel, where you can explore a 6-year-old but very informative playlist with video tutorials related to Retopology in Blender for beginners.
Why Use Blender for Retopology?
Blender stands out as one of the best tools for retopology thanks to its robust built-in features, wide array of add-ons, and active user base. Since it's free and open source, anyone can access high-end retopology tools without paying a cent.
Blender includes tools like snapping, shrinkwrap modifiers, poly build, and various mesh editing options that make manual retopology straightforward. Additionally, you can expand its capabilities with popular add-ons like:
- RetopoFlow: A dynamic, sketch‑based retopology add-on for Blender, developed by Orange Turbine. It offers an intuitive "Retopology Mode" that automatically snaps custom geometry to your high‑poly models as you draw directly on their surfaces, eliminating the hassle of shrinkwrap hacks or fiddling with object scale, snapping, and visibility settings while cleanly overlaying your low‑poly mesh without visual artifacts.
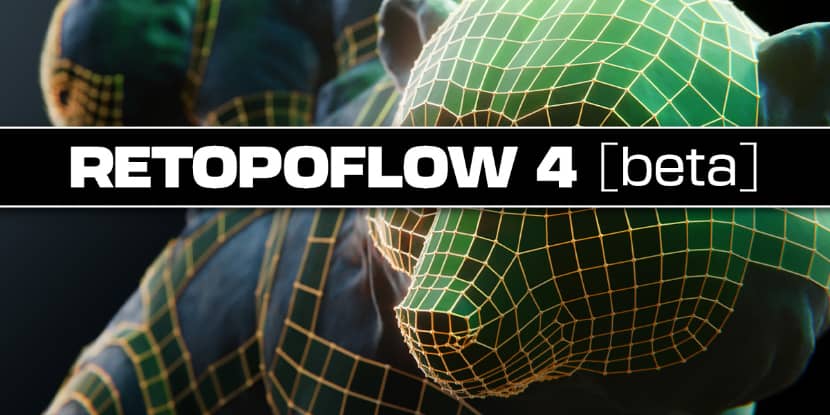
Version 4 introduces a complete rewrite that deeply integrates RetopoFlow into Blender's native Edit Mode, significantly improving performance and workflow fluidity. Its tools, such as Contours, PolyStrips, Strokes, PolyPen, Relax, and Tweak, are crafted to make retopology feel more like drawing or sculpting than repetitive mesh editing, helping artists generate clean, evenly spaced quads efficiently. - BSurfaces (GPL Edition): A versatile, community-supported modeling and retopology extension for Blender, seamlessly integrated into Blender's Edit Mode toolbar under the sidebar → Edit tab. Originally included in Blender 2.8+, it offers a sketch‑based workflow, letting users draw freehand strokes, annotations, Bezier curves, or edge loops and convert them into clean polygonal surfaces composed predominantly of quads (with triangle options when using crossing strokes). Artists can build both open and closed shapes, extrude selections, and bridge mesh sections with fine control, making it a powerful tool for manual retopology and modeling.
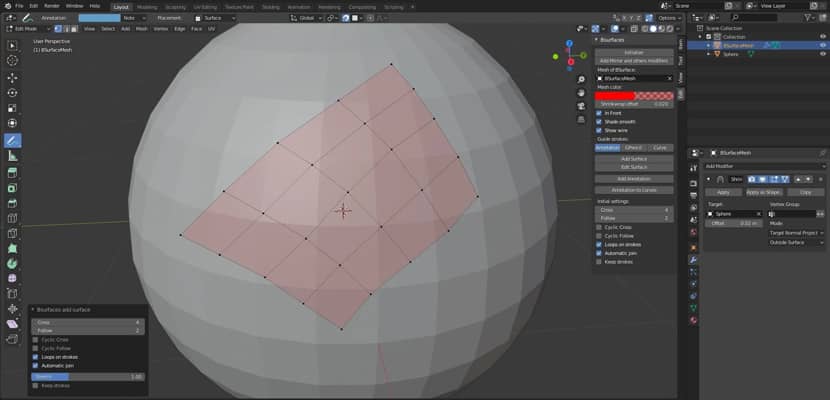
The addon simplifies retopology by aligning strokes to the surface or 3D cursor, offering quick guides that translate into geometry, speeds up workflows, especially for detailed areas like facial loops. While it's now maintained as a Blender extension rather than a preference‑activated plugin, it remains largely compatible with Blender 4.2 LTS and newer versions such as 4.3, though some users note compatibility issues or crashes in very recent releases. - Quad Remesher by Exoside: A powerful automatic quad‑retopology engine designed to transform complex, messy geometry such as high-resolution sculpts, booleans, or mixed-polygon meshes into clean, uniformly-structured all-quad models. Available as plugins for industry-standard platforms like 3ds Max, Maya, Modo, Blender, Houdini, and previously Cinema 4D, it caters to Windows, macOS, and Linux users.
The tool lets artists set target quad counts and adapt polygon density based on surface features like curvature or vertex-painted guides. It intelligently respects existing surface attributes, such as material IDs, creased normals, and hard edges, to maintain edge flow and preserve detail while simplifying topology for animation, UVs, or sculpting bases. - SpeedRetopo: Developed by Pitiwazou (Cédric Lepiller), is a streamlined retopology add‑on for Blender that automates repetitive setup tasks while giving you full creative control. With tools like one-click retopology, automated management of modifiers such as Shrinkwrap and Mirror, and custom utilities like Relax, Align‑to‑Center, Freeze, and special shading modes, the add‑on lets you focus on crafting clean, efficient meshes with minimal manual setup. Compatible with Blender versions 2.9 through 4.4, it works hand-in-hand with built‑in tools like BSurfaces and LoopTools, there's no need for a custom retopology mode. Rated an average of 4.9 out of 5 stars across hundreds of reviews, users consistently describe it as a time-saving "perfect add-on" for retopology workflows.
It needs to be mentioned that auto-retopology tools aren't always perfect. You may still need to clean up areas manually, especially around joints or facial features.
When and Why Is Retopology Needed in a Project?
Retopology is typically needed when your model originates from sculpting or 3D scanning. These methods often produce dense, unmanageable meshes that can be unsuitable for real-time applications or animation.
If you're creating game assets, retopology ensures your models run smoothly in all 3d engines. For animation, it helps build topology that supports smooth deformations when rigged. Even in product visualization or VFX, clean geometry is essential to avoid several rendering issues and especially running out of memory.
While automatic tools are improving, manually retopologizing is still required for precise control, especially in high-stakes projects.
There are hundreds of tutorials around the net and in order to write this article, we explored dozens of them. This one below provides a complete, beginner-friendly guide to manual retopology in Blender, emphasizing the importance of understanding basic shapes and edge flow rather than relying solely on automated tools. The creator walks viewers through essential setup steps, including using the Decimate and Shrinkwrap modifiers for better performance and topology alignment. The tutorial focuses on building topology using simple geometry like circles and rectangles, forming clean edge loops and topology islands, and connecting them using recognizable patterns. It also explains how to strategically place quads for optimal loop cuts and deformation in animation. Finally, the instructor demonstrates how to use Blender’s built-in Loop Tools add-on to smooth and polish the mesh, creating professional-quality, animation-ready topology.
What's the Difference Between Topology and Retopology?
Topology refers to the way a 3D model's geometry is structured. How its vertices, edges, and faces are connected to form the surface of the mesh. Good topology ensures that the model deforms naturally during animation, supports clean shading, and allows for efficient UV unwrapping and texturing. It plays a crucial role in both visual quality and performance, especially when models are rigged, animated, or subdivided.
Retopology, on the other hand, is the process of rebuilding or restructuring that topology, typically converting a high-density, sculpted or scanned mesh into a cleaner, low-polygon version. Essential for optimizing models as it transforms dense or chaotic geometry into a well-organized mesh that’s easier to work with, while preserving the original shape and details through techniques like shrinkwrapping or baking.
In essence, while topology is the structure itself, retopology is the art of refining that structure for better performance, control, and usability across different stages of a 3D pipeline. Below is an in-depth tutorial on 3D topology, aimed at helping modelers understand not just what topology is, but why it matters and how to use it effectively. Jay explains topology as the structured arrangement of vertices, edges, and faces that define a 3D mesh, and dives into the three key reasons good topology is essential: optimizing polycount, enabling clean deformations (especially in animation), and achieving smooth visual results. The video covers both procedural (e.g., Dynamesh, ZRemesher) and manual methods of generating topology, weighing speed against control. He also emphasizes the importance of proper edge flow around deforming areas like the face, joints, and muscles, and shares professional insights on determining polycount budgets for real-time models. The tutorial finally contrasts topology strategies for game-ready vs. cinematic characters, shows examples of both good and bad topology, and explains how to strategically place stars (poles) and loops to maintain performance and form. It concludes with tips, book recommendations, and a look at his own production-ready base mesh design. Simply, a must-see!!
How Does the Blender Retopology Workflow Work With Manual Techniques?
Manual retopology in Blender starts with setting up your high-poly model as a reference. You then create a new mesh on top of it, using snapping and shrinkwrap modifiers to match the surface.
The Poly Build tool is perfect for laying down quads. You can extrude edges, add vertices, and fill faces. The Knife tool allows for manual cuts, and Blender’s snapping system ensures your geometry sticks to the high-poly reference.
Viewport overlays like X-Ray mode help with visual clarity, and modifiers like Mirror speed up symmetrical retopology.
How Is Manual Retopology Applied in Practice?
Let's say you sculpted a human face in Blender. The mesh has thousands of polygons, but it's not suitable for animation yet. You start by adding a new object and entering Edit Mode. Enable snapping to face and turn on the shrinkwrap modifier to make sure your new geometry adheres to the sculpt.
You begin building loops around the eyes and mouth, critical deformation areas. Using Poly Build, you shape the facial features with clean edge flow. Eventually, you fill in the rest of the face with quads, making sure to avoid n-gons and triangles.
Automated Retopology in Blender
While manual retopology gives you full control, Blender also offers automatic options. Tools like the Remesh modifier or external solutions such as Quad Remesher can quickly generate a clean mesh from your sculpt. These automated approaches are great for blocking out a base topology that you can later refine by hand.
Using Addons to Speed Up the Process
Blender’s addon ecosystem offers a huge time-saver for retopology. Popular options like Retopoflow give you specialized tools for drawing clean geometry directly on your sculpt, while bridges to tools like Instant Meshes help you combine the best of both manual and automated workflows.
We highly recommend this retopology tutorial by KennyArts because it stands out as one of the most approachable and effective guides available on YouTube. Viewers consistently praise its clarity, structure, and calming presentation style, making a complex topic feel not only understandable but even enjoyable. Many users, from complete beginners to those returning after years of frustration, mention that this was the first tutorial that truly helped them grasp retopology and move forward with confidence. This is another must-watch for anyone serious about improving their 3D modeling skills.
What Is Retopology Map Flow and Why Is It Important?
Map Flow in Blender refers to a retopology method designed to help transfer geometry and create clean topology based on the surface flow of a high-resolution model. It actually refers to the strategic organization of polygon edges (topology) on a 3D model to improve its suitability for animation, rendering, and other downstream processes. It's important because it directly impacts how a model deforms during animation, how efficiently it can be rendered, and how easily it can be textured.
Here's what Map Flow typically involves:
Core Concept: Map Flow allows you to manually draw or define loops or mesh guides (like eyes, mouth, limbs) on a high-poly mesh.
Use Case: It's often used in character modeling when you need precise control over edge loops, especially for deformable areas (eyes, mouth, shoulders, etc.). This approach ensures the resulting low-poly mesh:
- Deforms well in animation
- Retains important shapes
- Has evenly distributed polygons
How It Differs: Unlike automatic remeshers like ZRemesher or Quad Remesher, Map Flow method doesn't guess. Instead, you guide the flow manually, which makes it ideal for production-quality retopology where control is more important than speed.
What Are the Most Helpful Blender Retopology Shortcuts?
You can become faster when you master Blender's shortcuts. For example, pressing "Ctrl + R" lets you quickly add edge loops. "F" fills faces, "E" extrudes, and "G" grabs.
The Poly Build tool is accessible in the Toolbar while in Edit Mode, and you can toggle snapping with "Shift + Tab." The shrinkwrap modifier can be quickly added by selecting your object and pressing "Ctrl + A" > Add Modifier.
These shortcuts significantly speed up your retopology sessions once memorized, but speed is not only a matter of memory. It's mainly a matter of friendly workflow like the one we found on this successful video tutorial by Noggi. Indeed, it is a fast-paced yet detailed tutorial that offers a complete beginner-friendly breakdown of how to manually retopologize any model in Blender. It explains why retopology is essential for animation, rigging, and performance, and focuses on using Blender’s built-in tools—no add-ons required. The instructor covers snapping settings, edge flow, and the crucial "divide and conquer" method, where you first build a topology cage that defines the model’s structure before filling in the geometry. Tips like using the Grid Fill function, applying Shrinkwrap and Subdivision Surface modifiers, and restoring sculpted detail using Multires and Reshape are all included. This guide is ideal for artists who want to learn clean topology creation quickly, efficiently, and with full control.
A Final Word on Blender Retopology.
Learning how to retopologize in Blender is a game-changer for any 3D artist. While it may seem tedious at first, it's a fundamental skill that unlocks the full potential of your creations, especially when aiming for realism, animation, or game-ready assets. As automatic tools improve, manual retopology remains an irreplaceable part of high-quality workflows. With Blender's expanding capabilities and community support, there has never been a better time to master it.
FAQ
How much time does retopology usually require?
It depends on the model's complexity and your familiarity with the tools. Manual retopology can take several hours, while automatic methods may finish in minutes but need cleanup.
Is it possible to animate without doing retopology?
Technically yes, but you'll encounter issues like bad deformations, slow performance, or shading artifacts. Clean topology is essential for professional results.
How challenging is the retopology process?
For beginners, it can feel slow or confusing, but with practice, it becomes second nature. Blender's tools and add-ons help ease the learning curve.
What is the best way to refine retopology in Blender?
Use tools like the Relax brush, Merge by Distance, and manual cleanups with Poly Build. Always inspect your mesh for n-gons and poor edge flow.
How is topology defined in the context of 3D modeling?
Topology refers to the way vertices and edges are connected on a mesh. Good topology allows better animation, cleaner UVs, and more realistic shading.
Thank you for taking the time to read this article and we hope that it provided you with a good understanding of what retopology is, how it works and how you can become more familiar with this necessary 3D technique.
Kind regards & Keep rendering! 🧡
About the author
Vasilis Koutlis, the founder of VWArtclub, was born in Athens in 1979. After studying furniture design and decoration, he started dedicating himself to 3D art in 2002. In 2012, the idea of VWArtclub was born: an active 3D community that has grown over the last 12 years into one of the largest online 3D communities worldwide, with over 160 thousand members. He acquired partners worldwide, and various collaborators trusted him with their ideas as he rewarded them with his consistent state-of-the-art services. Not a moment goes by without him thinking of a beautiful image; thus, he is never concerned with time but only with the design's quality.
![]()
![]()
![]()
![]()
![]()
