
Animation is all about bringing still images to life, piecing frame after frame together to build the illusion of movement. While the concept sounds simple, creating believable motion requires careful control of timing, spacing, and transitions so that every action feels smooth and natural.
One of the common challenges both beginners and professionals face? Fast and dynamic movement.
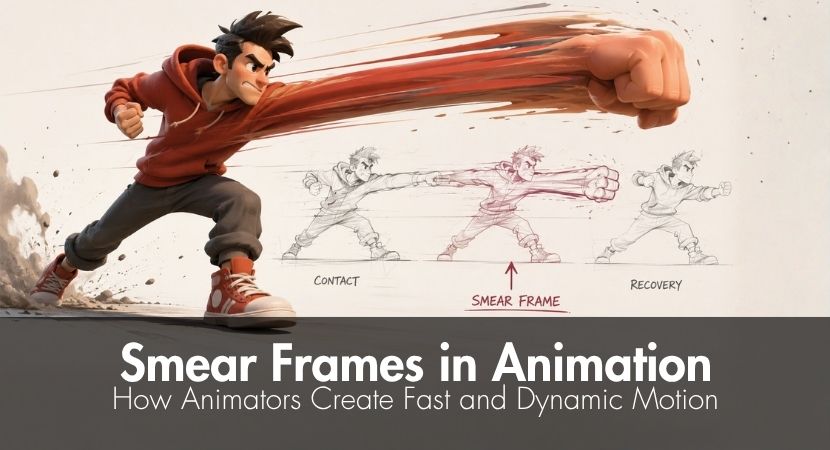
One of the most effective techniques is smear frames. By briefly stretching or multiplying the appearance of a moving object between key poses, smear frames create the illusion of continuous motion while keeping the action clear to the viewer.
This technique is used in both 2D and 3D animation. After reading through this guide, you'll know what smear frames are, their importance, the best time to use them, when not to, practical tips, and more.
What Are Smear Frames?
Smear frames are, in simple terms, frames that are "smeared" or distorted. These frames are placed between two main frames (called "extremes") and are there to portray motion, mostly fast and dynamic movements.
This technique has been in use for a long time, even in 2D animation workflows, and later carried into modern workflows. Great examples of animated films where smear frames were generously used are Hotel Transylvania (2012), The Legend of Korra (2012), Popeye Cartoon (1933), and the majority of early Disney cartoons.
In the early days of animation, smear frames were created by hand to convey rapid movement that couldn't be clearly shown with only a few drawings. Alongside techniques such as action lines, smoke trails, and dry-brush streaks, they helped create the illusion of speed and became a defining feature of many classic cartoons.
Although animation technology has evolved, these principles continue to influence modern 2D and 3D workflows.
For animators studying frame-by-frame motion, related techniques such as onion skinning can also help with reviewing timing, spacing, and motion arcs during the animation process.
Want to see how smear frames work in practice? This tutorial breaks down the idea behind the technique and shows how animators use distortion and exaggeration to create fast, dynamic movement.
Why Animators Use Smear Frames
Animators use smear frames not only to tie two frames together, but to produce the following effects:
Motion blur without relying on the camera
Animation smears mimic motion blur, the way we see it with our eyes or how cameras perceive fast movements.
Better readability in fast action
Smear frames make fast movements easier for the audience to track. They show the direction in which an object or character is moving.
More impact and personality
Beyond serving as speed cues or simply smoothing out fast movements, smear frames also add character and personality to an animation. They give it punch, rhythm, and a sense of exaggerated motion that makes actions feel more alive and expressive.
How Smear Frames Work and What Types Exist
There are two main types of smear frames, but both share the same goal: creating the illusion of speed. However, each produces a different effect in the scene it is used in.
The core principle
Traditional animation creates the illusion of movement by displaying a series of drawings or poses in sequence. Normally, in-between frames are added to smoothly connect one pose to the next. However, when an action happens extremely quickly, there may not be enough frames available to show every stage of the movement without slowing it down.
As a result, the animation may only show the starting pose and the ending pose, causing the action to appear as if it suddenly jumps from one position to another. Smear frames solve this problem by briefly filling that gap, creating the illusion of continuous motion while preserving the speed of the action.
Two main smear techniques
a. Elongated in-between smears: these are stretched out frames placed in between two extremes (start and end frames).
b. Multiple smears: uses multiple smeared versions of the same object or character between two key frames to emphasize extremely fast movement and make the motion easier to follow.
Common variations
a. Ghosted/duplicated - the use of the same smear repeated multiple times to create the illusion of rapid movement. Sometimes, these duplicated smears are made transparent.
b. Hybrid smears - the use of both elongated and non-elongated smears to achieve better readability.
When to Use Smear Frames and When to Avoid Them
Smear frames are extremely useful, but they are not always the best tool for every situation. In some cases, they can even make a scene look worse if they are overused or applied incorrectly.
Best moments for smears
Smear frames help animators make speed recognizable to the audience, much like how we perceive speed in real life through motion blur, trailing elements (such as wind or smoke), and rapid changes in movement.
This is very useful in scenes where a subject makes a quick turn, an object is thrown, or during fight scenes, chases, snapping movements, exaggerated gags, and many other fast actions.
When smears hurt the shot
There are instances where smears would initially make sense, but once applied, they can look a bit off, especially during scenes where clarity is a priority.
This is often the case in animations with a realism-heavy style, when characters have messy silhouettes, when actions involve confusing shapes, or when too many smear frames are used in succession.
Consistency across a scene
If you use animation smears, keep their intensity, shape, and style consistent throughout the whole movement and even in other scenes. Smears should follow the same visual language so they blend naturally instead of distracting the audience or making the motion feel inconsistent.
Smear Frames vs Motion Blur
Smear frames are animator-driven, meaning animators intentionally place them to create the effect a scene needs. Motion blur, on the other hand, is a camera or rendering effect that is usually applied automatically. The difference is that smear frames give animators more control over scene readability, allowing them to maintain the subject's silhouette, shape, and direction of motion.
Another thing to note is that motion blur is an effect that smear frames can help achieve.
Smear Frames in 2D, 3D, and Other Mediums
As mentioned above, animation smears have been used for decades, and in other types of workflows - 2D, 3D, stop motion, and games.
While the goal of using smear frames is the same across mediums, the approach can be quite different for each.
2D approach
In 2D animation, everything is done manually using traditional drawing techniques. The start and end frames are preserved, while the frames in between are stretched, warped, or multiplied to create the illusion of speed.
The challenge is finding the right number of in-between frames. Too few can make the intended motion or speed feel subtle, while too many can disrupt the scene. It is also important to maintain silhouette clarity and smooth motion arcs, as they can easily become distorted due to the nature of hand-drawn animation.
3D approach
In 3D animation workflows, instead of manually drawing each in-between frame, animators deform the subject's mesh or rig, duplicate it along the motion arc, and use motion blur to amplify the effect.
Smear frames are often associated with traditional animation, but the same principles can also be applied in 3D. This example shows how animators recreate the effect inside Maya.
Stop Motion and Games
In stop motion, smear frames are less common because every frame usually requires a physical model, prop, or replacement part. When they are used, animators may create stretched limbs, motion trails, or specially shaped replacement pieces to suggest speed between poses.
In games, smear frames are often used for readability and responsiveness. Weapon swings, dashes, punches, and fast combat arcs may include stylized smears so players can quickly understand the direction and impact of an action without slowing down gameplay.
How to Create Smear Frames Step by Step
Here's a practical way to create smear frames that beginners can follow:
A simple workflow you can follow
- Identify fast motion: determine whether a smear frame is actually needed. Look for movements that are difficult to recognize using only the two main frames (the start and end frames). Ask yourself whether a smear frame will make the motion more readable.
- Plan timing: decide where the smear frame should be placed and how long it should appear on screen.
- Choose a smear type: select the type of smear that best communicates the movement while matching the overall style of the animation.
- Place the smear between extremes: Position the smear frame between the starting and ending poses, following the direction and arc of the movement.
- Test playback: play the animation at full speed. Did the smear successfully enhance the animation? Is the timing natural?
- Refine: fine-tune to lessen distortion and improve clarity. Adjust timing if needed.
Applying Smears in Digital Workflows
In digital animation, smear frames can be created through frame-by-frame distortion, duplicated elements, deformation tools, or controlled blur effects. The method depends on the style of the shot, but the goal stays the same: the smear should support the motion without making the subject unreadable.
For 2D workflows, this may mean stretching a drawing, duplicating a limb, or shaping the in-between frame more aggressively along the motion arc. In 3D workflows, animators may deform the mesh, duplicate a pose along the path, or combine a stylized smear with subtle motion blur.
For larger 3D animation projects, a structured production workflow also helps keep animation, lighting, rendering, and revisions organized across the full pipeline.
The most important step is playback. A smear that looks strange on a single frame can work perfectly at full speed, while a visually interesting smear may fail if it distracts from the action.
Practical Tips and Common Pitfalls
When using smear frames, it is important not only to understand how they work, but also to recognize that every project is different. There is no single correct way to use smear frames, as the best approach depends on the style, timing, and other needs of the animation.
With that in mind, here are some practical tips to improve your results, along with common pitfalls to avoid.
Tips that improve readability
- When you play the animation at full speed, make sure that the silhouette remains clear through the motion arc.
- The transition should be smooth, not choppy, abrupt, or too slow. In short, it should appear natural or should adhere to the animation's overall style.
- ONLY apply smears to actions that will benefit from it. Adding too many smear frames can make your scenes look chaotic or distracting.
- The amount of distortion or smear should blend with the rest of your animation's style.
- Smear frames should follow the natural path of the movement, which will help the audience easily follow the motion and understand the movement.
Mistakes and quick fixes
- Wrong timing - smear frames inserted too early or too late can make the movement feel awkward. Play the animation back at normal speed and adjust the timing until the motion feels natural.
- Too many smears - an unnecessary amount of smears can make your animation look distracting. Only apply smears when really needed. Watch a movement without smear frames animation before using them.
- Unreadable shapes - do not overly distort frames, as this will make your subject unrecognizable if done too much.
- Inconsistent style - your smears should be as cartoony or realistic as your whole film/scene.
- Unclear motion path - your smears should follow the natural motion path of the movement so that they'll properly connect your two extremes.
How to study smear frames
Experience is the number one teacher when it comes to learning how to use smear frames animation. Use them whenever appropriate, always play your scenes back, identify areas that feel awkward, and refine the timing and shapes until the motion reads clearly.
It is also a good habit to compare your work with professional animation by looking at scenes frame by frame and studying how smear frames are used for different types of actions.
Start Practicing Smear Frames
If you want to practice creating smear frames before you apply them to real animation work, a good exercise would be to animate single objects first, doing singular movements in a single direction.
- Bouncing ball - vertical motion.
- A character throwing a punch - horizontal motion.
- A kid on a swing - parabolic motion.
Once you are comfortable with these fundamentals, challenge yourself by animating multiple objects moving in different directions. As the complexity increases, you'll develop a better understanding of when smear frames animation improves clarity and when they are unnecessary.
FAQ
How do I decide between an elongated smear and a multiple smear?
Both techniques suggest speed, but they work better in different situations. However, an elongated smear works best for movements that are fast and take a singular path, such as punches, swings, and turns. Multiple smears are best for stylized animations.
How can I tell if my smear is too subtle or too extreme?
The easiest way to tell if a smear is too subtle or too extreme is to play the movement back full speed. Check if the movement looks natural and if the subject's silhouette appears clear throughout the motion. If it is too distracting, then your smear is too extreme. If the movement feels abrupt or stiff, then the smear is too subtle. Getting the perfect outcome involves trial and error.
Can smear frames work in a more realistic animation style?
Yes. Animations that use smears can still be realistic with the right timing and the right amount of intensity.
What should I do if my smear looks confusing or messy?
If your smear looks confusing or messy, it can mainly be two things. You either have used too much smear or your smears are too distorted. Try lessening smears, maintaining a recognizable silhouette, and making sure that smears align with the motion arc with good timing. Then, test and fine-tune.
What is a good practice exercise to improve smear timing?
Practice with simple objects performing a single movement along a clear motion path. A bouncing ball is one of the best exercises because its acceleration, direction, and timing are easy to follow, allowing you to focus entirely on where the smear frame should appear. After each attempt, play the animation back at full speed and evaluate whether the motion feels smooth, natural, and uncluttered, then make small adjustments to the smear timing as needed. As your skills improve, gradually increase the difficulty by animating multiple objects or actions that involve changes in direction and more complex motion.

About the author
Nicole Holt is an experienced 3D enthusiast with a career in marketing and content writing. Thanks to this unique combination, she is able to showcase the technical intricacies of 3D art and rendering while also making the subject accessible to a wide audience. When she's not immersed in the digital world, Nicole can be found in the great outdoors, most likely with her beloved dog, Sammy.