
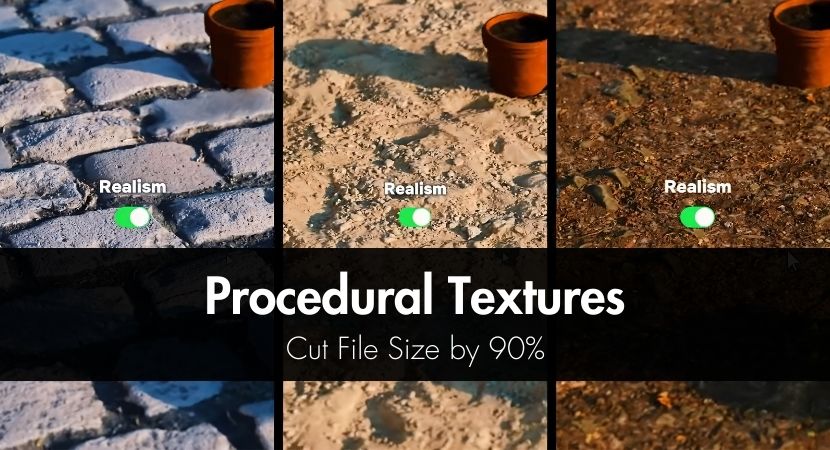
Texture libraries are holding down production since they are expanding more quickly than our hard drives. In this new RebusFarm guide, we explore how procedural textures can reduce file sizes by up to 90%, speed up render farm uploads, and provide 3D artists limitless versatility without sacrificing quality. Learn how to use node-based texturing to work more quickly and intelligently, and discover why it's becoming an essential skill in modern workflows.
You have probably seen your texture collection expand from a few folders to multiple terabytes of data if you have been working in 3D long enough. Render farm uploads become a waiting game due to high-resolution scans, layered bitmaps, and infinite texture variations that gradually consume disk space and slow down scene loading. A distinct perspective is provided via procedural texturing. You store logic rather than images. This article explains how generative textures may significantly speed up production workflows, reduce file sizes by up to 90%, and provide a level of flexibility that conventional image-based textures just cannot match.
Projects with a lot of heavy textures are among the most prevalent production obstacles. Dozens of 4K or 8K textures are frequently used for each object in large environments, architectural scenarios, and asset libraries. When you multiply that over a whole scene, render farm uploads become extremely slow. By substituting mathematical descriptions created at render time for stored images, procedural texturing addresses this issue at its core.
Because procedural textures are lightweight, resolution-independent, and infinitely configurable, they perform better in production than traditional picture textures. Artists can adjust parameters and produce fresh results instantaneously rather than baking every modification into a new file. When working across teams or exporting projects to cloud render services like RebusFarm, this method significantly minimizes storage requirements and speeds up iteration.
Procedural workflows can minimize render farm upload times by more than half and storage utilization by up to 90% by using pattern-based logic instead of pixel data. Major software programs like Blender, Autodesk Maya, 3ds Max, Cinema 4D, and others all follow these fundamental principles. The fundamental concepts are the same even though the node systems may vary.
What Are Procedural Textures and Why Should You Care?
You should be concerned about procedural textures because they significantly lower file size while enhancing flexibility and control. Procedural textures are materials created by mathematical functions instead of stored image files. The texture is computed on the fly using characteristics like noise, gradients, and patterns rather than loading pixels from storage.
Understanding procedurally generated textures versus bitmap textures starts with how information is stored. Fixed-resolution images, in which each pixel is stored on disk, are the foundation of bitmap textures. Regardless of resolution, procedural textures are based on equations that specify how the surface should appear.
Pixel-based data and math-driven data are fundamentally different. Each pixel's color value is stored in a bitmap, whereas instructions are stored in a procedural texture. This means that whereas an image texture needs to be changed or upscaled, a procedural texture can be produced at any resolution without losing detail.
The true advantages are obvious. Resolution becomes almost infinite, file sizes decrease from gigabytes to kilobytes, and variations are produced by modifying sliders instead of sourcing new images. This flexibility directly translates into more rapid production for artists handling large scenes or even short deadlines.
Eliminating stored pixel data results in a 90% savings. While a procedural node configuration can only require a few kilobytes, a single 4K texture can easily surpass 80 MB. When you multiply this by dozens or hundreds of materials, the storage difference grows significantly.
For materials like wood, concrete, fabric, and surfaces that produce noise, procedural textures are perfect. For really particular elements like logos, decals, or scanned items with distinct flaws, image textures still make sense.
In the following video, Graffinity breaks down what procedural materials really are and why they differ fundamentally from traditional image-based PBR textures. In order to create procedural materials that are indefinitely detailed and resolution-independent even when zoomed in thousands of times, the video describes how several mathematically driven texture layers are stacked inside a node-based system. The main production benefits of procedural processes are also highlighted, including significantly reduced file sizes, real-time customization of attributes like color, roughness, damage, and scale, and the capacity to produce an infinite number of variations without generating new texture files. Lastly, it demonstrates why procedural methods provide greater flexibility, minimize memory consumption, and prevent tiling artifacts.
How Do Pattern-Based Procedural Textures Work?
Pattern-based procedural textures work by combining mathematical noise, repeating patterns, and functions to simulate real-world surface detail. These systems generate complicated outcomes from basic inputs by utilizing building elements including Perlin noise, Voronoi patterns, gradients, and masks.
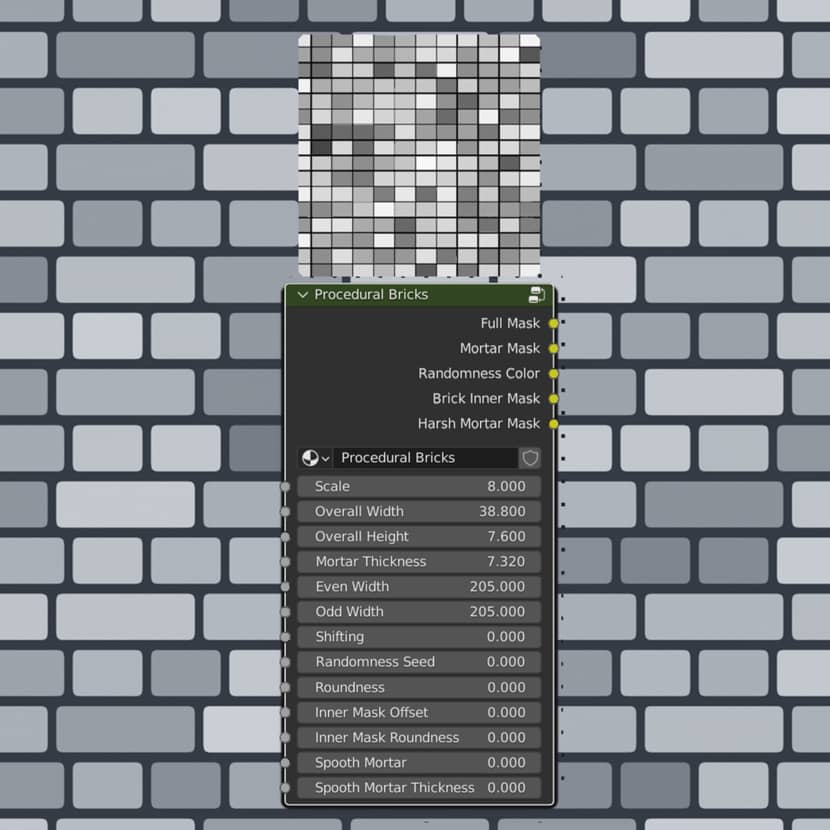
Image Credits: Szabo Bendeguz
Procedural textures are fundamentally based on layered and warped patterns and noise. In addition to representing randomness, a single noise node can mimic cloth weave, stone veins, or wood grain when paired with color ramps and coordinate manipulation.
These kind of textures based on patterns are very effective in architecture and design. It is possible to precisely manage the scale, spacing, and variety of brick walls, tiles, concrete panels, and facade features. This makes it simple to modify materials for various applications without starting from scratch.
Noise, Voronoi, gradient, color ramp, and mix nodes are common procedural nodes that all artists should be familiar with. Regardless of the software, these elements serve as the basis for the majority of procedural materials.
Complexity is developed incrementally. Artists overlay simple components, modify parameters, and combine outcomes rather than beginning with a complicated graph. Materials are kept adaptable and simple to optimize because to this modular approach.
The following beginner-focused video, by Ryan King Art, introduces the fundamentals of procedural nodes in Blender explaining how materials can be created entirely inside the software without using external textures. It demonstrates how procedural workflow is combined to create customizable materials that can be scaled, randomized, and altered in real time by going over the fundamental logic of Blender's node-based system. It also offers a useful basis for comprehending how Blender's procedural texturing functions and why it is such an effective, adaptable method for contemporary 3D production workflows.
Creating Your First Procedural Textures in Popular Software.
Before diving into software-specific workflows, it’s important to understand that procedural texturing follows the same core principles no matter the application you use. While each tool uses its own node system a, the logic behind building materials remains the same.
Blender Procedural Texturing Made Simple.
A node-based approach is used to create Blender procedural textures, which enable artists to visually construct materials. To begin, one must comprehend the interactions between color ramps, noise nodes, and texture coordinates.
Noise Texture, Voronoi Texture, Musgrave Texture, and ColorRamp are crucial nodes for Blender. Combining these nodes can produce intricate organic patterns as well as slight surface variation.
The most practical method is frequently to combine procedural and image textures. For instance, generative noise can add realism without appreciably increasing file size by breaking up the consistency of a bitmap texture.
Optimizing performance is crucial. Maintaining responsiveness while working can be achieved by keeping node graphs tidy, minimizing superfluous high-frequency noise, and evaluating materials at reduced viewport quality.
Maya Procedural Textures and Hypershade.
Hypershade is used to produce Maya procedural textures by combining nodes like ramp, fractal, and noise to create materials. Although the interface is different, the workflow is essentially comparable to Blender.
Surface breakdown and gradients can be precisely controlled by using ramps and fractal patterns. Technical visualization and styled assets are two areas where these technologies are most helpful.
Procedural textures provide additional benefits when working with Arnold. Large scenes intended for render farms benefit greatly from the fact that many Arnold nodes are designed for rendering and memory efficiency.
In this video, Abe Leal 3D showcases how Maya’s Hypershade can be used as a powerful node-based tool for building both traditional fully procedural materials. The video walks through creating materials directly inside Maya using Arnold nodes, showing how color, roughness, metalness, opacity, and subsurface scattering can all be driven procedurally without relying on external texture files. Additionally, he highlights why Hypershade is such a flexible tool for generating variation and creating complex effects like animated noise, force fields, and layered materials entirely within the shader network.
Essential Procedural Materials Every Artist Needs.
Let's explore some of the most common materials that usually artists need and how to create them.
How to Create Procedural Wood Texture?
Using noise and radial gradients, growth rings and grain patterns are simulated to generate a procedural wood texture. A noise node that is warped along an axis to resemble real wood fibers is usually used as the foundation.
Coordinates are mapped into circular gradients to create ring patterns, and layered noise is used to produce grain variation. Everything from polished hardwood to rough, old timber can be produced by varying scale and distortion.
Color ramps are used to create color variation, which enables artists to adjust saturation and hue shifts. Masks can be used to layer weathering effects like wear and discolouration on top.
Another informative and detailed video tutorial by Ryan King Art to learn how you can create a procedural wood plank material in Blender:
Common Procedural Patterns.
Brick and tile patterns are ideal for procedural textures in architectural visualization. Parameters control brick size, mortar width, and offset, making materials reusable across projects.
Fabric weaves and patterns rely on repeating noise and directional distortion. These materials benefit from procedural variation that avoids visible tiling.
Metal scratches and wear are typically created using high-frequency noise layered over smooth base materials. This adds realism without heavy texture maps.
Concrete and stone variations use layered noise and subtle color shifts to simulate aggregate and surface imperfections.
How to Export Procedural Textures from Blender?
When necessary, procedural textures can be exported from Blender by baking them into image maps. In order to use node-based materials in other software or game engines, this process transforms them into traditional textures.
Baking entails selecting the proper map types, such as diffuse, roughness, and normal, and then adjusting the resolution according to the desired platform. Carefully choosing a resolution preserves quality while controlling file sizes.
Baking is only required at the very end of most tasks. During production, procedural materials remain lightweight and flexible.
A fast explanation about the process by 5 Minutes Blender:
Procedural vs Image Textures: When to Use Each?
When file size, flexibility, and variation are important considerations, procedural textures perform exceptionally well. Unique details that are difficult to quantify mathematically are better suited for image textures.
Image textures can be gigabytes in size, whereas procedural textures usually take up kilobytes to megabytes. While image textures are static and fixed, procedural materials provide infinite resolution and unlimited variations.
Render farm uploads benefit significantly from procedural textures. Smaller project sizes mean faster transfers and fewer storage constraints, which directly impacts turnaround time on services like RebusFarm.
Comparison Table.
| Aspect | Procedural Textures | Image Textures |
|---|---|---|
| File Size | KB–MB | GB |
| Resolution | Infinite | Fixed |
| Variations | Unlimited | One |
| Render Farm Upload | Fast | Slow |
| Memory Usage | Low | High |
Where to Find Free Procedural Textures?
Generally, through presets, node groups, and community platforms, many artists provide free procedural textures. These resources can be used as teaching aids and as a place to start when creating original content. It is frequently possible to transform free materials into fully procedural settings by substituting pattern logic and noise for baked maps. Artists can eventually create their own lightweight libraries that suit their requirements.
The Blender community is one of the best places to start. Complete procedural materials are shared by several artists that you can include straight into your designs. In contrast to closed assets, platforms such as Blender Artists and Gumroad frequently offer free procedural elements that are completely customizable.
Sketchfab is another excellent resource. Although 3D models are its most well-known feature, many authors post models that contain procedural materials that you may examine, analyze, and modify. This is particularly helpful for comprehending how artists employ masks, patterns, and noise to create realistic effects without using bitmap textures.|
Libraries of open-source materials are also worth investigating. Procedural presets designed to be tweaked rather than utilized as-is are often found in projects developed around Blender and other node-based tools.
Lastly, constructing your own procedural library from simple building blocks is one of the most sustainable methods. You may repurpose and modify basic materials like concrete, textiles, wood, or tiles for a variety of tasks if you know how to assemble them procedurally. With time, this personal library—which is lighter, more adaptable, and precisely suited to your workflow—becomes far more valuable than any collection of static image textures.
Advanced Tips for Production Pipeline.
Optimization for Render Farms.
Because procedural textures minimize project size, they upload more quickly. Faster scene loading and reduced memory consumption are advantages of render farms, particularly in distributed environments.
Handling complex computations is crucial. Maintaining render efficiency can be achieved by caching complicated procedural results or baking only when required.
Team Collaboration.
Clear documentation and uniform naming conventions are necessary for sharing procedural materials among teams. Smaller files are advantageous to version control systems and facilitate easier collaboration.
Node trees reduce redundancy between projects since they are simpler to update and modify than image libraries.
Common Procedural Texturing Mistakes to Avoid.
- Node graphs that are too complicated can impede renderings and counteract speed improvements. Maintaining modular and tidy setups is crucial.
- Stretching or repetition problems are frequently caused by ignoring texture coordinates. In procedural operations, proper mapping is equally important.
- Achieving the ideal performance without compromising visual quality requires striking a balance between generated and baked textures.
Frequently Asked Questions.
Can procedural textures look as good as scanned textures?
Yes, procedural textures can achieve comparable realism, especially for materials like wood, stone, and concrete, which follow natural patterns.
Do procedural textures render slower than images?
In most cases, procedural textures are efficient, but extremely complex setups may require optimization or partial baking.
Which software is best for procedural texturing?
The best software depends on workflow preference, but Blender and Maya both offer robust procedural systems.
Can I use procedural textures in game engines?
Cloud GPU = you configure everything manually.
Render farm = automated, optimized rendering with support.
Can I use RunPod or Paperspace for rendering in Maya or Blender?
Yes, although procedural textures are often baked before export to ensure compatibility and performance.
Conclusion.
Procedural texturing is more than just a disk space-saving tactic. It is a change in perspective that puts scalability, efficiency, and flexibility first. Artists may significantly reduce file sizes, expedite render farm uploads, and produce an endless number of variations without incurring additional storage expenses by substituting dynamic logic for static images. Learning procedural texturing is now essential for modern production workflows that prioritize speed and optimization and every project benefits from this competitive advantage.
We appreciate you reading this guide. I hope this helped you consider procedural texturing as a more intelligent and adaptable method of creating materials in contemporary 3D processes, rather than just a technique to save file sizes. We are all motivated by the same love of 3D art and the desire to work more productively while consistently improving the standards of our craft, regardless of the tools or methods we select.
Kind regards & Keep rendering! 🧡

About the author
Vasilis Koutlis, the founder of VWArtclub, was born in Athens in 1979. After studying furniture design and decoration, he started dedicating himself to 3D art in 2002. In 2012, the idea of VWArtclub was born: an active 3D community that has grown over the last 12 years into one of the largest online 3D communities worldwide, with over 160 thousand members. He acquired partners worldwide, and various collaborators trusted him with their ideas as he rewarded them with his consistent state-of-the-art services. Not a moment goes by without him thinking of a beautiful image; thus, he is never concerned with time but only with the design's quality.
![]()
![]()
![]()
![]()
![]()
